Sauna Paneling: Boards, Battens, and Good Joints
By Saima Honkanen · Updated November 2026
In short
Install sauna paneling on straight, securely anchored battens, with the drying path required by your wall system. Horizontal boards usually fit over vertical battens; vertical boards need horizontal fixing rails with airflow preserved behind them. Acclimate and fasten the exact product as instructed, allow movement, and keep bench loads on structural backing.
Good paneling is quiet work. The rows meet neatly, the corners have room to move, and nothing behind the boards depends on luck. A plain board installed well will serve the room better than an expensive one nailed over a crooked, damp wall.
Choose the wood and its profile together. Then get the installation sheet before buying the fasteners or setting the battens. Tongue-and-groove describes a family of joints; it does not tell you where every manufacturer wants a nail.
This guide follows a framed, foil-lined sauna with a drying space behind the wood. Complete the insulation and vapor-control design first. Proprietary rooms and solid-log walls can use different assemblies.
What makes a useful sauna panel?
Look for straight, accurately milled boards intended for sauna walls or ceilings, with sound edges and a surface you can clean. Ask about the exact species, grade, moisture condition, finish, and installation method. “Premium wood” does not answer any of those questions.
Spruce, aspen, alder, cedar, and suitable thermally modified products give different appearances and scents. The wood guide compares species. Here the more useful distinction is between a decorative wall and a contact surface. A beautiful textured wall can still be unpleasant behind a bare shoulder; a backrest gives that shoulder a predictable surface.
Finnish manufacturer Aureskoski’s AURE panel information illustrates why the product matters. Its spruce panels include sauna-specific profiles and finishes, and the installation note recommends face nailing in saunas despite a concealed-nailing profile. You cannot infer the approved attachment merely by looking at the tongue.
In Sauna-lehti’s account of Koti Sauna in Brussels, Anna Clarac describes choosing wood even though lighter construction was possible, because its scent mattered to the group. That is a useful reminder that a material choice includes the bathing experience. It is not evidence that one species is technically superior in every sauna.
How much should you order?
Measure each wall and the ceiling separately. Work from coverage width, the amount of wall each fitted board covers, rather than the width across the loose board and its tongue. Divide the finished run by that coverage, then round up to whole boards.
For example, a 72-inch-wide surface divided by a 3-inch coverage width takes 24 board widths. That arithmetic says nothing about waste at doors, damaged pieces, or the available board lengths. Make a cutting list before applying a percentage allowance.
Lay out the first and last rows on paper. An attractive full board at one corner can leave a fragile sliver at the other. Adjust the starting width while allowing the required edge clearance. Carry the layout across adjoining walls if horizontal joints are meant to line up.
Buy enough matching material for the room, including realistic cuts and a few repair pieces. Keep a labeled offcut showing the species, profile, and finish. Years later, that small scrap is more useful than remembering that the wood was “the pale one.”
How should boards acclimate?
Finish wet construction work and establish suitable installation conditions first. Store the material flat, supported, dry, and away from direct heat. Do not try to accelerate acclimation by firing the sauna with a stack of boards inside it.
Puuinfo’s Finnish general paneling instructions distinguish wrapped, indoor-stored products from unwrapped stock: its example periods are two days in the package and about a week respectively, with the manufacturer’s directions taking precedence. These are general interior guidelines, not a universal sauna schedule.
The practical question is whether this delivered product is ready for these installation conditions. Ask the supplier how its packaging should be handled, and whether a moisture measurement is appropriate. A calendar alone cannot tell you that wet wood has dried. Conversely, opening factory packaging against instructions can create an avoidable problem.
Inspect before cutting. Set aside loose knots, damaged tongues, splits, and boards with doubtful machining. Sort color and grain while the stock is accessible. The first time you notice an unsuitable board should not be after its neighbors have trapped it against the ceiling.
How does the grain affect movement?
Wood gains and loses moisture, changing dimensions much more across the grain than along it. The direction of the growth rings also matters. Puuinfo’s technical explanation of moisture movement connects this unequal movement with cupping, twisting, and end checks.
That means a wide flat-sawn board can ask more of its fixing than a narrower one. Do not promise that a clear face or a dark thermal treatment will prevent movement. Choose the permitted support spacing, fastening pattern, and edge allowances for the product you actually have.
Leave the joint engagement and expansion room prescribed by its manufacturer. Do not drive each row together as tightly as the hammer will allow. Use a suitable protective block when needed, and stop if the joint requires force: a damaged tongue, bowed board, or misplaced fastener may be the real problem.
At corners, allow boards to move beneath the trim. A trim piece should conceal the planned space, not lock adjacent walls together. Keep it clear of any opening the lining design needs for drying.
Should the boards run horizontally or vertically?
Either direction can look at home in a sauna. The supporting layers change.
Horizontal boards: vertical battens give the fasteners repeated landing points and leave channels behind the paneling. Confirm how those channels communicate with the room at their ends.
Vertical boards: horizontal fixing rails support the paneling. Continuous rails laid directly against the foil can divide the cavity into closed pockets. One clear solution is vertical counterbattens behind the horizontal rails. A different, manufacturer-approved ventilating rail arrangement may also work. Do not assume the rails’ orientation alone guarantees airflow.
HUUM’s Estonian construction guide illustrates both single-rail and crossed-batten approaches. Its drawings show particular assemblies; the lesson is to trace a connected path behind the wood, not copy one layer without the adjoining details.
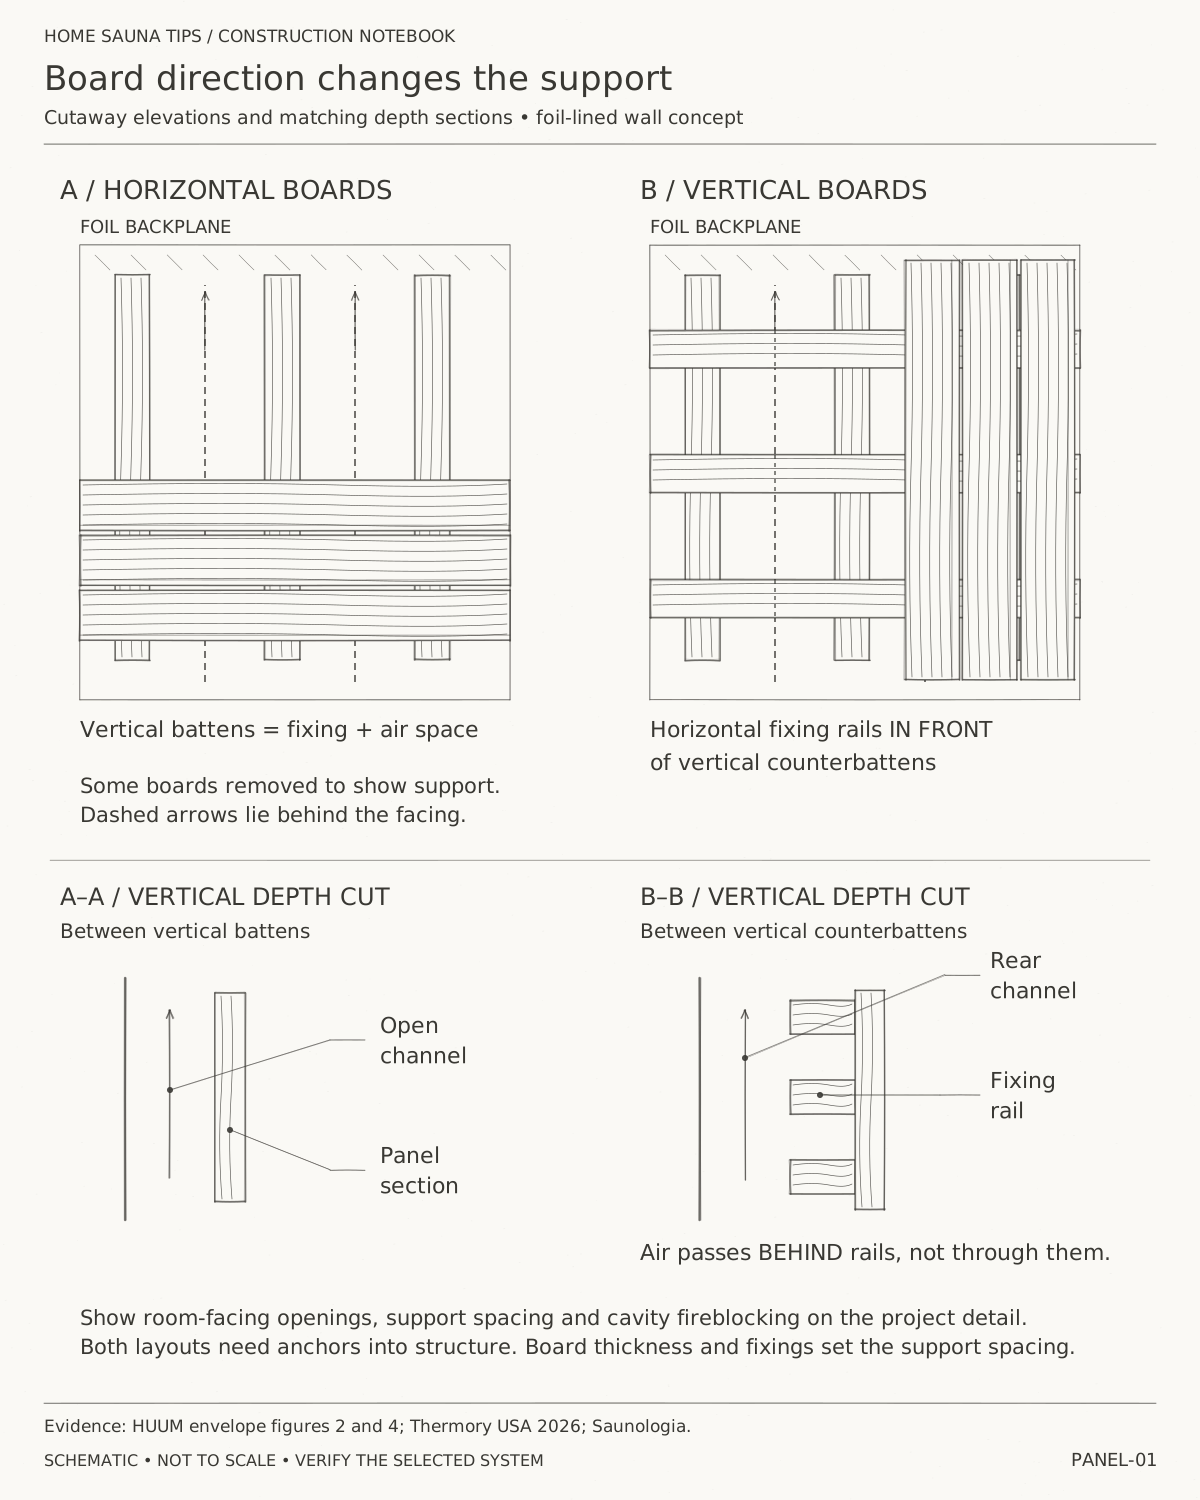
Do not route this drying space into the insulation or attic. The IRC fireblocking provisions address concealed furred spaces and their interconnections. Agree the applicable termination detail before deciding that a convenient hidden opening is a vent.
How do you get the battens right?
Check the wall with a long straightedge before installing boards. Bring the batten faces into one plane with suitable fastening and packing. A level checks direction; it does not by itself reveal every hollow in a wall.
In his Finnish battening and paneling guide, Lassi A. Liikkanen treats the batten work as the foundation of an easy installation. He also stresses that battens over PIR need an attachment into the structure, not merely into insulation. His published gap and batten dimensions describe his approach, rather than a universal minimum.
Plan support at cut ends, corners, openings, and ceiling edges. Then check that added blocking does not close the intended drying path. A short board beside a door still needs a sound fixing; it should not hang from its neighbor’s tongue.
Bench brackets, heater brackets, and loaded backrests need their own structural attachment. Locate and photograph that backing before paneling. Mark a plan with dimensions from permanent references, such as the door opening. A pencil mark on foil disappears remarkably well behind a board.
Which fasteners should you use?
Use the manufacturer’s specified corrosion resistance, fastener type, size, placement, and spacing. Stainless steel is commonly specified, but selecting stainless alone does not settle the attachment.
Two current instructions show the difference:
- Thermory’s April 2026 US guide specifies staples through the groove for its hidden-fixing panels and says finishing nails are unsuitable. Horizontal boards have the tongue up and are installed from the top down.
- Karava’s Finnish installation sheet allows concealed nailing for specified profiles and recommends face nailing for others. Its instructions also call for identifying hidden service routes before fastening.
There is no honest universal answer of “use an 18-gauge brad.” Take the actual offcut, batten, and specified fastener to the bench and make a trial joint. Adjust the tool so the fixing seats without crushing the lip or leaving metal proud. Check that the next board engages fully.
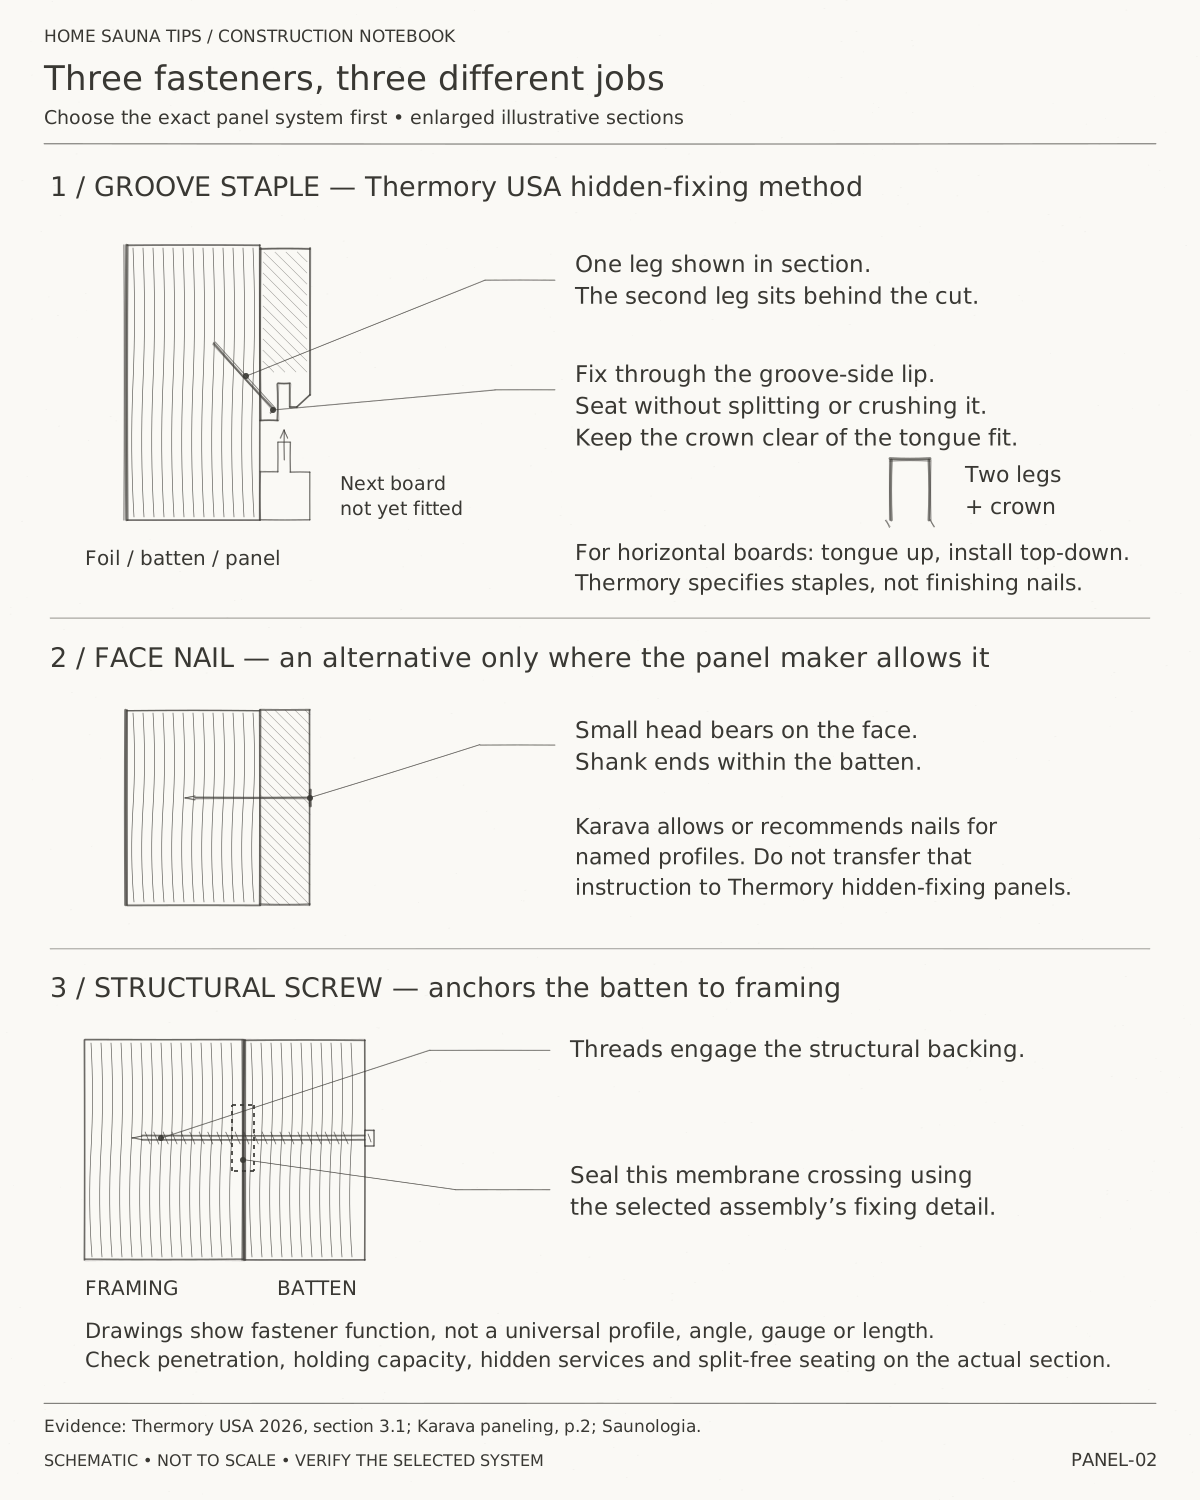
Check penetration depth against the actual section, not just the length printed on the box. An angled fastener’s path differs from a square-driven one. Panel fixings must hold adequately without accidentally reaching the foil; structural batten fixings need their own membrane-sealing detail. A longer fastener is not automatically better.
Does thermally modified wood need different handling?
Yes. The International ThermoWood Association’s handbook describes reduced moisture movement but also reduced splitting strength. Its fastening guidance specifies corrosion-resistant fasteners and attention to predrilling. Thermal modification is useful; it does not make a delicate groove indestructible.
Support boards during cuts, use sharp tooling, and avoid levering a tight joint into place. Follow the product’s pilot-hole and end-distance requirements. If a fixing splits a board, correct the cause and replace the damaged piece; the next board should not be used to hide the failure.
Check contact surfaces for raised grain and sharp edges before use, and again after the first heating and drying cycles. Sand sound wood where needed without destroying the profile. A deep split or loose splinter calls for replacement. No species name can guarantee that every board will remain splinter-free.
What deserves attention at the ceiling and floor?
Work out the ceiling layout before the wall rows lock in the perimeter. Support every required fixing point and follow the panel system’s overhead fastening instructions. Keep service openings where the equipment manufacturer permits them, including access for future work.
At the bottom, keep wood ends out of standing water and preserve the specified junction with the waterproofed floor or tiled upstand. Do not use a trim strip to disguise a missing waterproofing connection. Paneling is the finish over that detail.
Check the finished room dimensions against heater and chimney clearances. Battens, thicker panels, decorative trim, and backrests all occupy space. Measure to the surfaces and components named in the heater’s manual, not to the original bare studs.
Should you oil, wax, or leave the walls bare?
Bare wood is a straightforward choice where the panel manufacturer permits it. A suitable sauna finish can also make sense, especially where cleaning or color matters. “Finnish practice” is not a ban on every coating.
Tikkurila’s Finnish Supi Saunasuoja data explicitly describes a sauna wall and ceiling product and excludes benches. Its Supi Laudesuoja is a different product, a paraffin oil intended for bench wood. These are examples of surface-specific approval, not interchangeable cans.
Make a sample on an offcut. Follow preparation, coating quantity, curing, and initial heating and ventilation instructions. Do not improvise with leftover deck stain or household polyurethane. A finish cannot rescue damp construction or replace the gap behind the boards.
Before the first bath, remove dust, check for exposed sharp metal and splinters, and verify the drying openings. Keep the leftover boards dry and labeled. After the first few uses, look again at corners and fastenings. Small changes are easier to address while they are still small.
Questions people ask
- Should sauna paneling run vertically or horizontally?
- Either can work. Horizontal boards commonly use vertical battens. Vertical boards use horizontal fixing rails; counterbattens or an approved ventilating rail detail must preserve airflow behind them. Choose the look after accounting for this extra wall depth and support.
- Can I use a brad nailer for sauna paneling?
- Only if the specific panel manufacturer allows that fastening method. Thermory’s US sauna guide specifies staples for its hidden-fixing panels and rejects finishing nails. Other Finnish profiles allow or require face nailing. Match the fastener to the profile.
- Must sauna walls remain unfinished?
- Bare wood is a useful option, but sauna-specific finishes also exist. Choose a product explicitly intended for the wood surface and sauna location. A wall finish is not automatically suitable for a bench, and ordinary household paint or varnish is not a substitute.
Sources
- Puuinfo — Ohjeet panelointiin (Finnish; general interior paneling)
- Puuinfo — Puun kosteuskäyttäytyminen (Finnish; wood movement)
- Karava — Näin paneloit saunan (Finnish installation sheet)
- Thermory USA — Sauna Wall Paneling Installation Guide, April 2026
- Saunologia — Sisäsaunan koolaus ja panelointi (Finnish)
- HUUM — Sauna room structures, Arden Arroval (Estonia)
- International ThermoWood Association — Handbook 2025, sections 4.5.8 and 9
- Puuinfo / Aureskoski — AURE sauna panel product instructions
- Tikkurila — Supi Saunasuoja, intended surfaces and commissioning
- Tikkurila — Supi Laudesuoja, bench oil instructions
- Suomen Saunaseura / Sauna-lehti — Koti Sauna, Brussels (2022)
- ICC — 2021 IRC chapter 3, concealed-space fireblocking